// The module 'vscode' contains the VS Code extensibility API
// Import the module and reference it with the alias vscode in your code below
import*asvscodefrom'vscode';// This method is called when your extension is activated
// Your extension is activated the very first time the command is executed
exportfunctionactivate(context: vscode.ExtensionContext){// Use the console to output diagnostic information (console.log) and errors (console.error)
// This line of code will only be executed once when your extension is activated
console.log('Congratulations, your extension "mermaid-azure" is now active!');// The command has been defined in the package.json file
// Now provide the implementation of the command with registerCommand
// The commandId parameter must match the command field in package.json
constdisposable=vscode.commands.registerCommand('mermaid-azure.helloWorld',()=>{// The code you place here will be executed every time your command is executed
// Display a message box to the user
vscode.window.showInformationMessage('Hello World from mermaid-azure!');});context.subscriptions.push(disposable);}// This method is called when your extension is deactivated
exportfunctiondeactivate() {}
exportfunctionactivate(context: vscode.ExtensionContext){// Chat の処理を行う関数
consthandler: vscode.ChatRequestHandler=async(request: vscode.ChatRequest,context: vscode.ChatContext,stream: vscode.ChatResponseStream,token: vscode.CancellationToken):Promise<ICatChatResult>=>{// To talk to an LLM in your subcommand handler implementation, your
// extension can use VS Code's `requestChatAccess` API to access the Copilot API.
// The GitHub Copilot Chat extension implements this provider.
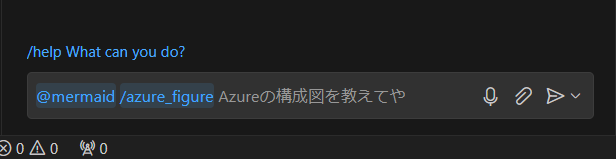
if(request.command=='azure_figure'){// コマンドが azure_figureコマンドの場合
stream.progress('Mermaid の図を考えています...');// プログレスバーを表示
try{const[model]=awaitvscode.lm.selectChatModels(MODEL_SELECTOR);// モデルを取得
if(model){// モデルが取得できた場合
constmessages=[// メッセージを作成
vscode.LanguageModelChatMessage.User(system_pronpt),// システムプロンプトを追加
vscode.LanguageModelChatMessage.User(request.prompt)// ユーザーの入力を追加
];constchatResponse=awaitmodel.sendRequest(messages,{},token);// モデルにリクエストを送信
stream.markdown('```\n');// マークダウンのコードブロックを開始
forawait(constfragmentofchatResponse.text){// レスポンスのテキストを取得
stream.markdown(fragment);// マークダウンに追加
}stream.markdown('\n```');// マークダウンのコードブロックを終了
}}catch(err){// エラーが発生した場合
handleError(err,stream);}return{metadata:{command:'azure_figure'}};// メタデータを返す
}else{// それ以外の場合
try{const[model]=awaitvscode.lm.selectChatModels(MODEL_SELECTOR);// モデルを取得
if(model){// モデルが取得できた場合
constmessages=[// メッセージを作成
vscode.LanguageModelChatMessage.User(`あなたは Mermaid を使って図を書くことが得意です。`),vscode.LanguageModelChatMessage.User(request.prompt)];constchatResponse=awaitmodel.sendRequest(messages,{},token);// モデルにリクエストを送信
forawait(constfragmentofchatResponse.text){// レスポンスのテキストを取得
// Process the output from the language model
stream.markdown(fragment);}}}catch(err){handleError(err,stream);// エラーが発生した場合
}return{metadata:{command:''}};// メタデータを返す
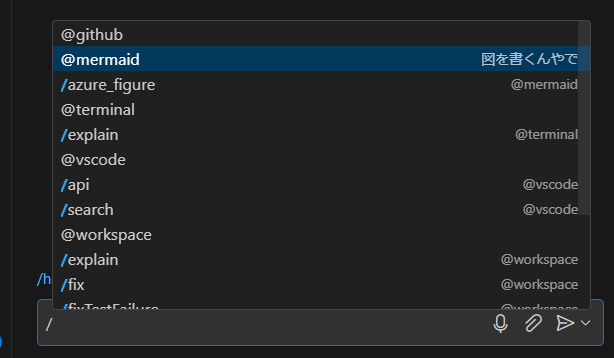
}};// Chat participants appear as top-level options in the chat input
// when you type `@`, and can contribute sub-commands in the chat input
// that appear when you type `/`.
constmermaid=vscode.chat.createChatParticipant(CHAT_PARTICIPANT_ID,handler);// ChatParticipantを作成
mermaid.iconPath=vscode.Uri.joinPath(context.extensionUri,'azure_mermaid.jpg');// アイコンを設定
mermaid.followupProvider={// フォローアッププロバイダーを設定
provideFollowups(result: ICatChatResult,context: vscode.ChatContext,token: vscode.CancellationToken){// フォローアップを提供
return[{// フォローアップを返す
prompt:'create a figure',// プロンプトを設定
label: vscode.l10n.t('Create the figure'),// ラベルを設定
command:'azure_figure'// コマンドを設定
}satisfiesvscode.ChatFollowup];// ChatFollowupを返す
}};// よくわからないので ほとんどコピペ
context.subscriptions.push(// ChatParticipantを登録
mermaid,// ChatParticipantを登録
//
vscode.commands.registerTextEditorCommand(MERMAID_NAMES_COMMAND_ID,async(textEditor: vscode.TextEditor)=>{// テキストエディタコマンドを登錻
// Get the text from the editor
consttext=textEditor.document.getText();letchatResponse: vscode.LanguageModelChatResponse|undefined;// ChatResponseを初期化
try{const[model]=awaitvscode.lm.selectChatModels({vendor:'copilot',family:'gpt-4'});// モデルを取得
if(!model){// モデルが取得できない場合
console.log('Model not found. Please make sure the GitHub Copilot Chat extension is installed and enabled.')return;}constmessages=[// メッセージを作成
vscode.LanguageModelChatMessage.User(`You are a cat! Think carefully and step by step like a cat would.
Your job is to replace all variable names in the following code with funny cat variable names. Be creative. IMPORTANT respond just with code. Do not use markdown!`),vscode.LanguageModelChatMessage.User(text)];chatResponse=awaitmodel.sendRequest(messages,{},newvscode.CancellationTokenSource().token);}catch(err){// エラーが発生した場合
if(errinstanceofvscode.LanguageModelError){// エラーが LanguageModelError の場合
console.log(err.message,err.code,err.cause)}else{// それ以外の場合
throwerr;}return;}// Clear the editor content before inserting new content
awaittextEditor.edit(edit=>{// エディタの内容をクリア
conststart=newvscode.Position(0,0);constend=newvscode.Position(textEditor.document.lineCount-1,textEditor.document.lineAt(textEditor.document.lineCount-1).text.length);edit.delete(newvscode.Range(start,end));});// Stream the code into the editor as it is coming in from the Language Model
try{forawait(constfragmentofchatResponse.text){// レスポンスのテキストを取得
awaittextEditor.edit(edit=>{constlastLine=textEditor.document.lineAt(textEditor.document.lineCount-1);constposition=newvscode.Position(lastLine.lineNumber,lastLine.text.length);edit.insert(position,fragment);});}}catch(err){// エラーが発生した場合
// async response stream may fail, e.g network interruption or server side error
awaittextEditor.edit(edit=>{constlastLine=textEditor.document.lineAt(textEditor.document.lineCount-1);constposition=newvscode.Position(lastLine.lineNumber,lastLine.text.length);edit.insert(position,(<Error>err).message);});}}),);}
functionhandleError(err: any,stream: vscode.ChatResponseStream):void{// making the chat request might fail because
// - model does not exist
// - user consent not given
// - quote limits exceeded
if(errinstanceofvscode.LanguageModelError){console.log(err.message,err.code,err.cause);if(err.causeinstanceofError&&err.cause.message.includes('off_topic')){stream.markdown(vscode.l10n.t('I\'m sorry, I can only create Azure diagrams.'));}}else{// re-throw other errors so they show up in the UI
throwerr;}}
// The module 'vscode' contains the VS Code extensibility API
// Import the module and reference it with the alias vscode in your code below
import*asvscodefrom'vscode';constCHAT_PARTICIPANT_ID='mermaid-azure.chat';constMERMAID_NAMES_COMMAND_ID='mermaid.namesInEditor';constMODEL_SELECTOR: vscode.LanguageModelChatSelector={vendor:'copilot',family:'gpt-4'};constsystem_pronpt=`\あなたは Mermaid を使って Azure の構成図を書くことが得意です。
サブスクリプションや、リソースグループ、Vnet など図の中で箱として扱うものは subgraph として表現します。
Vnet Peering や VPN, Private Link などは矢印で関係性を表現します。
色分けして見やすくするために以下のように表示します。
- サブスクリプション:fill:none,color:#345,stroke:#345
- ネットワーク関連:fill:none,color:#0a0,stroke:#0a0
- VM、Private Endpoint:fill:#e83,color:#fff,stroke:none
- PaaS:fill:#46d,color:#fff,stroke:#fff
ユーザーからのリクエスに対して 上記のルールに従って Mermaid のフローチャートで回答を出力してください。
リソースグループやサブスクリプションは指定された場合のみ回答に含めて、それ以外の場合は回答に含めないでください。
インデント以外の、余計な半角スペースは入れないでください。
以下に例を3つ示します
例1
入力:
ハブ&スポークの構成です。スポークは3つあります。
出力:
---
title: ハブ&スポークの構成
---
graph TB;
%%グループとサービス
subgraph hub_Vnet[hub-Vnet]
end
subgraph Spoke1["Spoke 1"]
end
subgraph Spoke2["Spoke 2"]
end
subgraph Spoke3["Spoke 3"]
end
%%サービス同士の関係
hub_Vnet <-- "ピアリング" --> Spoke1
hub_Vnet <-- "ピアリング" --> Spoke2
hub_Vnet <-- "ピアリング" --> Spoke3
%%サブグラフのスタイル
classDef subG fill:none,color:#345,stroke:#345
class hubsub,sub1,sub2,sub3 subG
classDef VnetG fill:none,color:#0a0,stroke:#0a0
class hub_Vnet,Spoke1,Spoke2,Spoke3 VnetG
例2
入力:
ハブ&スポークの構成です。
スポークは3つあります。
ハブとスポークはすべて異なるサブスクリプションにデプロイされています。
ハブには VM が1台あります。
1つのスポーク用サブスクリプションには Storage Account があります。
出力:
---
title: ハブ&スポークの例 | VM, PaaS, Subscription の追加
---
graph TB;
%%グループとサービス
subgraph hubsub["Hub Subscription"]
subgraph hub_Vnet[hub-Vnet]
VM1("VM")
end
end
subgraph sub1["Spoke Subscription"]
subgraph Spoke1["Spoke 1"]
end
ST1{{"fa:fa-folder Storage Account"}}
end
subgraph sub2["Spoke Subscription"]
subgraph Spoke2["Spoke 2"]
end
end
subgraph sub3["Spoke Subscription"]
subgraph Spoke3["Spoke 3"]
end
end
%%サービス同士の関係
hub_Vnet <-- "ピアリング" --> Spoke1
hub_Vnet <-- "ピアリング" --> Spoke2
hub_Vnet <-- "ピアリング" --> Spoke3
%%サブグラフのスタイル
classDef subG fill:none,color:#345,stroke:#345
class hubsub,sub1,sub2,sub3 subG
classDef VnetG fill:none,color:#0a0,stroke:#0a0
class hub_Vnet,Spoke1,Spoke2,Spoke3 VnetG
%%ノードのスタイル
classDef SCP fill:#e83,color:#fff,stroke:none
class VM1 SCP
classDef PaaSG fill:#46d,color:#fff,stroke:#fff
class ST1 PaaSG
例3
入力:
サブスクリプションとリソースグループの階層構成を出力してください。
サブスクリプションは1つ。リソースグループは3つです。
それぞれのリソースグループにはリソースが2つ含まれています。
出力:
---
title: サブスクリプション全体構成
---
graph TD
sub1[サブスクリプション] --> rg1[リソースグループ1]
sub1 --> rg2[リソースグループ2]
sub1 --> rg3[リソースグループ3]
rg1 --> r1[リソース1]
rg1 --> r2[リソース2]
rg2 --> r3[リソース3]
rg2 --> r4[リソース4]
rg3 --> r5[リソース5]
rg3 --> r6[リソース6]
`;interfaceICatChatResultextendsvscode.ChatResult{metadata:{command: string;}}// This method is called when your extension is activated
// Your extension is activated the very first time the command is executed
exportfunctionactivate(context: vscode.ExtensionContext){// Chat の処理を行う関数
consthandler: vscode.ChatRequestHandler=async(request: vscode.ChatRequest,context: vscode.ChatContext,stream: vscode.ChatResponseStream,token: vscode.CancellationToken):Promise<ICatChatResult>=>{// To talk to an LLM in your subcommand handler implementation, your
// extension can use VS Code's `requestChatAccess` API to access the Copilot API.
// The GitHub Copilot Chat extension implements this provider.
if(request.command=='azure_figure'){// コマンドが azure_figureコマンドの場合
stream.progress('Mermaid の図を考えています...');// プログレスバーを表示
try{const[model]=awaitvscode.lm.selectChatModels(MODEL_SELECTOR);// モデルを取得
if(model){// モデルが取得できた場合
constmessages=[// メッセージを作成
vscode.LanguageModelChatMessage.User(system_pronpt),// システムプロンプトを追加
vscode.LanguageModelChatMessage.User(request.prompt)// ユーザーの入力を追加
];constchatResponse=awaitmodel.sendRequest(messages,{},token);// モデルにリクエストを送信
stream.markdown('```\n');// マークダウンのコードブロックを開始
forawait(constfragmentofchatResponse.text){// レスポンスのテキストを取得
stream.markdown(fragment);// マークダウンに追加
}stream.markdown('\n```');// マークダウンのコードブロックを終了
}}catch(err){// エラーが発生した場合
handleError(err,stream);}return{metadata:{command:'azure_figure'}};// メタデータを返す
}else{// それ以外の場合
try{const[model]=awaitvscode.lm.selectChatModels(MODEL_SELECTOR);// モデルを取得
if(model){// モデルが取得できた場合
constmessages=[// メッセージを作成
vscode.LanguageModelChatMessage.User(`あなたは Mermaid を使って図を書くことが得意です。`),vscode.LanguageModelChatMessage.User(request.prompt)];constchatResponse=awaitmodel.sendRequest(messages,{},token);// モデルにリクエストを送信
forawait(constfragmentofchatResponse.text){// レスポンスのテキストを取得
// Process the output from the language model
stream.markdown(fragment);}}}catch(err){handleError(err,stream);// エラーが発生した場合
}return{metadata:{command:''}};// メタデータを返す
}};// Chat participants appear as top-level options in the chat input
// when you type `@`, and can contribute sub-commands in the chat input
// that appear when you type `/`.
constmermaid=vscode.chat.createChatParticipant(CHAT_PARTICIPANT_ID,handler);// ChatParticipantを作成
mermaid.iconPath=vscode.Uri.joinPath(context.extensionUri,'azure_mermaid.jpg');// アイコンを設定
mermaid.followupProvider={// フォローアッププロバイダーを設定
provideFollowups(result: ICatChatResult,context: vscode.ChatContext,token: vscode.CancellationToken){// フォローアップを提供
return[{// フォローアップを返す
prompt:'create a figure',// プロンプトを設定
label: vscode.l10n.t('Create the figure'),// ラベルを設定
command:'azure_figure'// コマンドを設定
}satisfiesvscode.ChatFollowup];// ChatFollowupを返す
}};// よくわからないので ほとんどコピペ
context.subscriptions.push(// ChatParticipantを登録
mermaid,// ChatParticipantを登録
//
vscode.commands.registerTextEditorCommand(MERMAID_NAMES_COMMAND_ID,async(textEditor: vscode.TextEditor)=>{// テキストエディタコマンドを登錻
// Get the text from the editor
consttext=textEditor.document.getText();letchatResponse: vscode.LanguageModelChatResponse|undefined;// ChatResponseを初期化
try{const[model]=awaitvscode.lm.selectChatModels({vendor:'copilot',family:'gpt-4'});// モデルを取得
if(!model){// モデルが取得できない場合
console.log('Model not found. Please make sure the GitHub Copilot Chat extension is installed and enabled.')return;}constmessages=[// メッセージを作成
vscode.LanguageModelChatMessage.User(`You are a cat! Think carefully and step by step like a cat would.
Your job is to replace all variable names in the following code with funny cat variable names. Be creative. IMPORTANT respond just with code. Do not use markdown!`),vscode.LanguageModelChatMessage.User(text)];chatResponse=awaitmodel.sendRequest(messages,{},newvscode.CancellationTokenSource().token);}catch(err){// エラーが発生した場合
if(errinstanceofvscode.LanguageModelError){// エラーが LanguageModelError の場合
console.log(err.message,err.code,err.cause)}else{// それ以外の場合
throwerr;}return;}// Clear the editor content before inserting new content
awaittextEditor.edit(edit=>{// エディタの内容をクリア
conststart=newvscode.Position(0,0);constend=newvscode.Position(textEditor.document.lineCount-1,textEditor.document.lineAt(textEditor.document.lineCount-1).text.length);edit.delete(newvscode.Range(start,end));});// Stream the code into the editor as it is coming in from the Language Model
try{forawait(constfragmentofchatResponse.text){// レスポンスのテキストを取得
awaittextEditor.edit(edit=>{constlastLine=textEditor.document.lineAt(textEditor.document.lineCount-1);constposition=newvscode.Position(lastLine.lineNumber,lastLine.text.length);edit.insert(position,fragment);});}}catch(err){// エラーが発生した場合
// async response stream may fail, e.g network interruption or server side error
awaittextEditor.edit(edit=>{constlastLine=textEditor.document.lineAt(textEditor.document.lineCount-1);constposition=newvscode.Position(lastLine.lineNumber,lastLine.text.length);edit.insert(position,(<Error>err).message);});}}),);}functionhandleError(err: any,stream: vscode.ChatResponseStream):void{// making the chat request might fail because
// - model does not exist
// - user consent not given
// - quote limits exceeded
if(errinstanceofvscode.LanguageModelError){console.log(err.message,err.code,err.cause);if(err.causeinstanceofError&&err.cause.message.includes('off_topic')){stream.markdown(vscode.l10n.t('I\'m sorry, I can only explain computer science concepts.'));}}else{// re-throw other errors so they show up in the UI
throwerr;}}// This method is called when your extension is deactivated
exportfunctiondeactivate() {}